


Observatory Construction
January 17, 2007
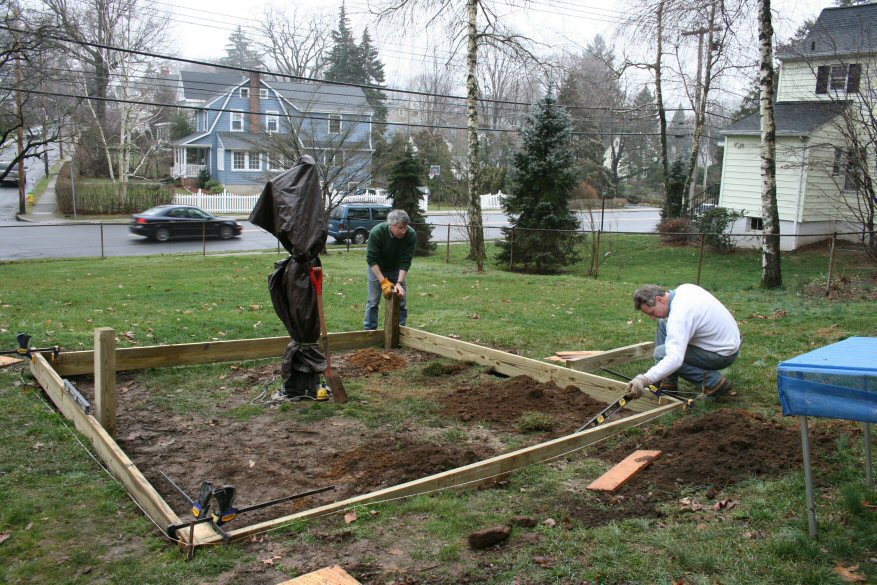
Today, with my friend Dan, we cut the post and peripheral joists for my future backyard observatory. The 12" DeWalt chopsaw made a quick job of the 4x6 posts and 8x2 joists.It took us 3 hours to get the 4 posts and 4 joists at level and forming a square. We had to dig the ground in a few places. Still, the top of the joists is a little higher than I wanted with respect to the pier, but it should be ok since I do not have a mile long refractor
Before the concrete, we added the last 2 posts (East and West walls which will support the rolling roof) and a 5th joist to bridge them and stiffen the frame.
We poured 8 80-lb bags of concrete into the 6 holes (each a little over 30 inches deep) and the rain started just when we were about done. My back will let me know tomorrow how well I did.
Thanks to Dan, we did this in about 7 hours total. All by myself, it would have been a different story.
Advice for those who will want to do this: make sure the frame is square after the pour. You will find it is likely no longer square (as we found out, by 2 inches...). It is not easy to straighten this out so here is a trick: use a long 2x8 and, with a buddy, use it as a ram to shift the posts so that you can get back to square.
Of course, what will happen is some joists will just start to slide off the posts, in spite of severall 12d nails supposedly holding them. No matter, hammer the board out a bit to allow the nails to be bent back during the next ramming session. Or, just take them out and re-nail the board (using a different hole!).
We got back to being 1/4" out of square and called it good enough. The hour of reckning will be when the rolling roof has to go in and track without derailing...
The place is a bit messy right now (and the night has fallen): dirt mounds here and there that will need to be cleaned up.
Due to the slope of the terrain, the south end joist is about 6" above ground near the southwest corner. I will need to add a fine lattice to block this area and prevent rodents or racoons from settling in.
Next come the rest of the joists and the casing around the pier: I want to reduce the pathways for bugs to come inside, a major challenge I know.
The rest of the wood is scheduled for delivery next Saturday. A good thing the garage now has more space: 62 2x4x12s are coming!
January 20, 2007
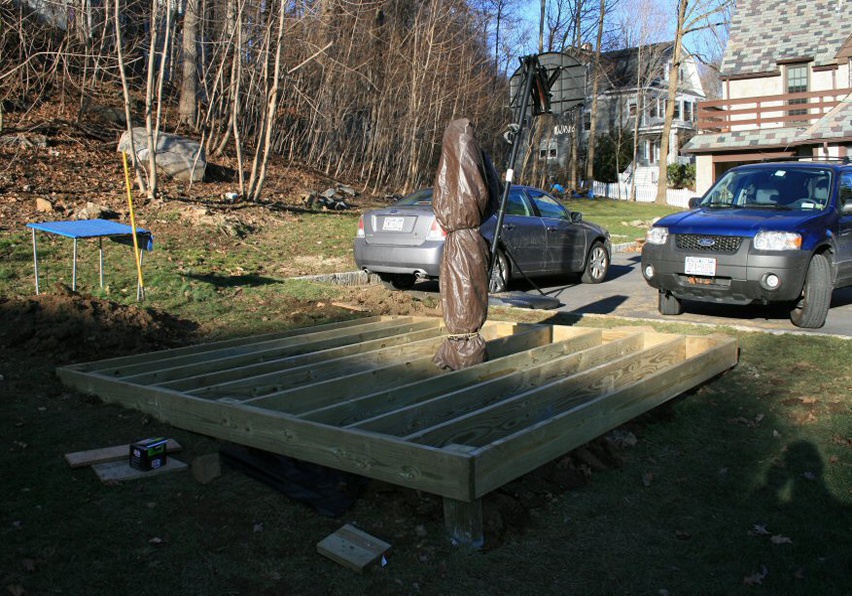
Spent the entire day adding joists to the frame built the previous weekend. I had to dig out more earth to allow room for the hammer to swing.
It was cold and windy but clear skies, so that was good.
All in all I must have nailed about 100 of these 12d nails: a few more weeks and I can dream of arm-wrestling...
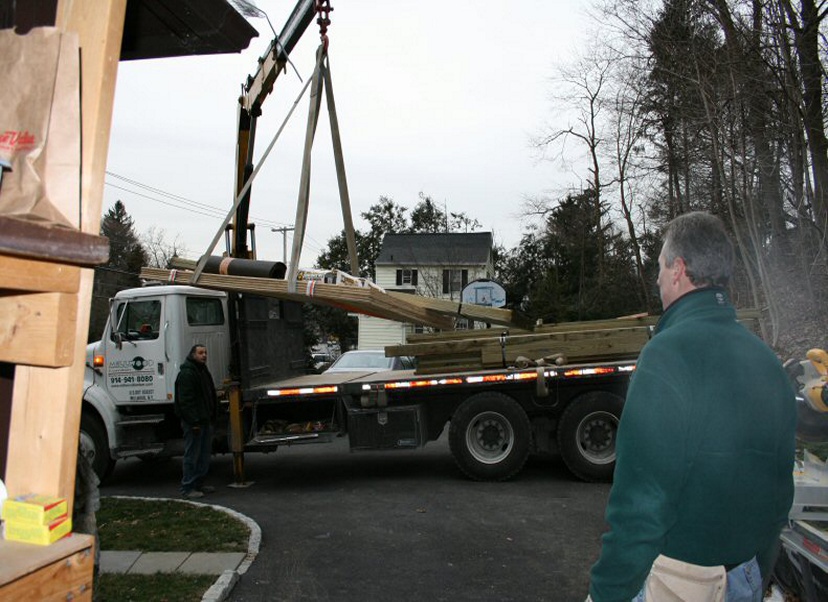
The lumber truck came in just before lunch with the studs (62), sheathing (20 4x8s) and a few 4x6s.
Trouble is, the tongue & groove floor boards were missing, and I only realized it in the evening when putting it all in the garage. Not a big deal, I 'll have a restful Sunday...
I put black plastic over the ground under the joists to prevent unwanted growth.
I added a 1.5" diameter pvc pipe with 90° elbows going from the pier to the west wall: I will use it to funnel all the cabling needed for imaging and control.
I also dug out the 110 line and disconnected the outlet I had taped to the pier. I ran the line into conduit (0.5" exterior pvc) to the west wall where I will bring in the electricity into the observatory later on.
Finally I added some support under the joists running on each side of the pier. Maybe they are not needed, but this way, the floor will be very robust.
The surprise this week came from the neighbors: they cut down a large number of trees and the result is a wider shouthwest horizon: way to go Ken!
If they had done this 2 months ago, I would not have gotten my zoning variance. Sometimes things do turn out good.
Spent the entire day adding joists to the frame built the previous weekend. I had to dig out more earth to allow room for the hammer to swing.
It was cold and windy but clear skies, so that was good.
All in all I must have nailed about 100 of these 12d nails: a few more weeks and I can dream of arm-wrestling...
The lumber truck came in just before lunch with the studs (62), sheathing (20 4x8s) and a few 4x6s.
Trouble is, the tongue & groove floor boards were missing, and I only realized it in the evening when putting it all in the garage. Not a big deal, I 'll have a restful Sunday...
I put black plastic over the ground under the joists to prevent unwanted growth.
I added a 1.5" diameter pvc pipe with 90° elbows going from the pier to the west wall: I will use it to funnel all the cabling needed for imaging and control.
I also dug out the 110 line and disconnected the outlet I had taped to the pier. I ran the line into conduit (0.5" exterior pvc) to the west wall where I will bring in the electricity into the observatory later on.
Finally I added some support under the joists running on each side of the pier. Maybe they are not needed, but this way, the floor will be very robust.
The surprise this week came from the neighbors: they cut down a large number of trees and the result is a wider shouthwest horizon: way to go Ken!
If they had done this 2 months ago, I would not have gotten my zoning variance. Sometimes things do turn out good.
January 27, 2007
The lumber truck showed up around 10 am and dropped the tongue and groove boards and 6 2x6x12 that will be used to support the rolling roof when opened.
I had to go to the hardware store to get the black material that prevents weeds from growing, and installed the last strip.
Then the first tongue & groove boards went in. And the nailing fun began: 2 1/2 spiral galvanized nails, roughly 72 per 4x8 sheet. Of course I started nailing on the exterior joists. Not the thing to do with the frame that will have to be nailed there too... But I realized this after the first 4 feet: I will make marks on the side. It took a little while to get the hang of correctly hitting the nail's head, and there are few misses. The floor will be covered with an outdoor carpet or something like that so no one gets hurt walking on it.
Because the pier is offset from the center of the deck, I decided to simply open up a 7" diameter hole (the pier itself is a 6" diameter column from LeSueur, a nice well finished steel column). I had to wait until 3 pm when Ariane came back with the drill in order to drill the starter hole.
Not a problem, I used the time to cut all the walls' 2x4s to size (46 at 5'7", 6 at 11'6" and 6 at 10'8"). It will help tomorrow.
By the time darkness fell, the entire deck was put up. I found out the tongue and grooves need a little prodding (read: solid hammer blows on a spare strip of t&g to avoid damaging the tongues). All in all, it went well. I now need to trim the west side boards by about 5": tomorrow!
There may be some flurries tonight but I figured the t&g boards will be ok. I have plastic covers that I will likely staple to the floor since next week is the Boys Scout ski trip and I am going!
January 28, 2007
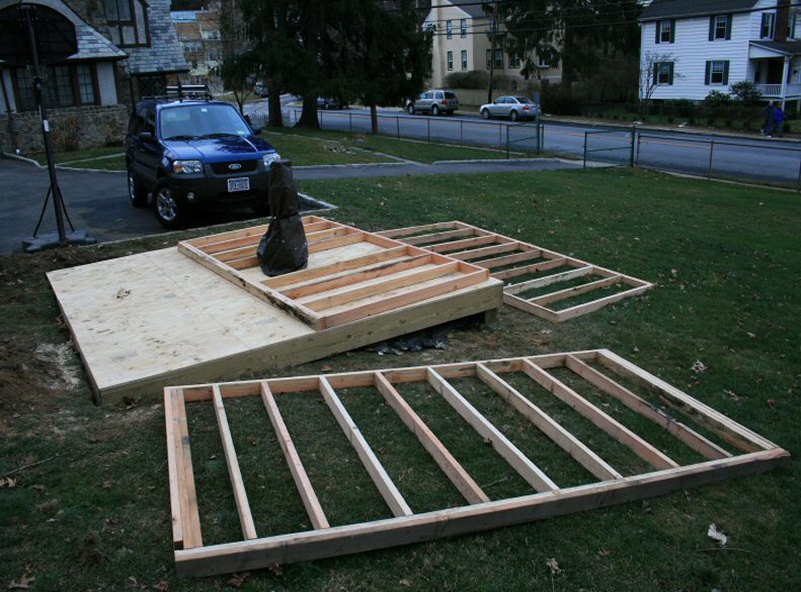
The deck platform was finished this morning, trimming the west and north side with the circular saw.
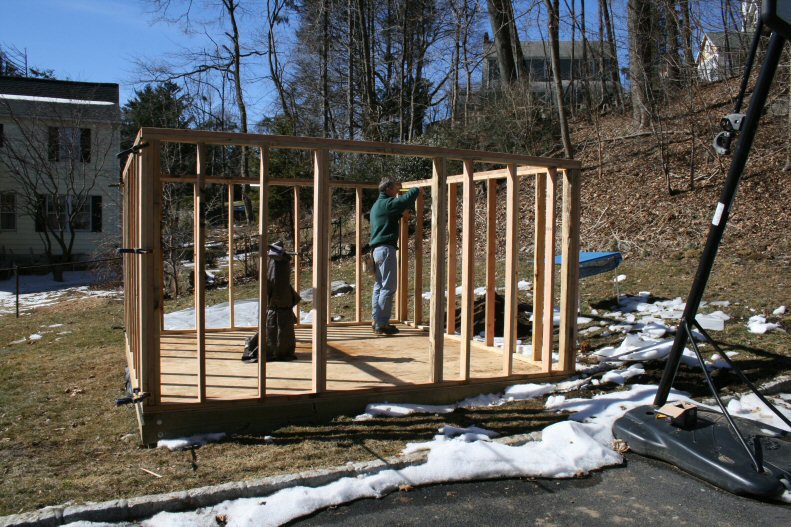
I started the walls in the afternoon and by 5 pm I was done with 3 of the frames (see picture). After nailing into pressure treated wood, the studs sometimes felt like butter. I had bad memories of hammering 12d nails (always managed to bend them) but this time it went rather well and I did not waste a lot (maybe 6 total).
The photo shows the two smaller walls (north and south) and one of the larger one, the west wall.
The south wall is on the deck and is missing the center stud because this is where the window will go. I have not sized it yet so there is more work to do. The west wall shows the notch (lower left of the photo) where the support rails will mate to the main structure.
All of them were then neatly stacked on top of each other on the deck (my back is a little bit sore as a result), and now underneath protective plastic to withstand the elements for the next two weeks.
I think I will nail the sheathing once I have put the walls up rather than flat on the deck. Actually I do not have much choice: the pier is in the way
I still need to put in the lag bolts in the posts...
The deck platform was finished this morning, trimming the west and north side with the circular saw.
I started the walls in the afternoon and by 5 pm I was done with 3 of the frames (see picture). After nailing into pressure treated wood, the studs sometimes felt like butter. I had bad memories of hammering 12d nails (always managed to bend them) but this time it went rather well and I did not waste a lot (maybe 6 total).
The photo shows the two smaller walls (north and south) and one of the larger one, the west wall.
The south wall is on the deck and is missing the center stud because this is where the window will go. I have not sized it yet so there is more work to do. The west wall shows the notch (lower left of the photo) where the support rails will mate to the main structure.
All of them were then neatly stacked on top of each other on the deck (my back is a little bit sore as a result), and now underneath protective plastic to withstand the elements for the next two weeks.
I think I will nail the sheathing once I have put the walls up rather than flat on the deck. Actually I do not have much choice: the pier is in the way
I still need to put in the lag bolts in the posts...
February 11, 2007
Not much activity this week end. I did put in the lag bolts, missing two on the north side due to lack of access. When spring comes, I'll dig around the posts and put the last 2.
Home Depot has shingles that sort of match the slate on the house roof, but it is a special order. I will do this next week.
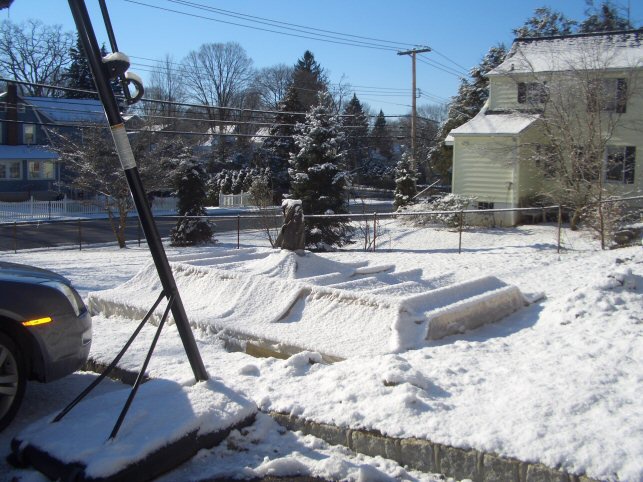
The picture above was taken last weekend after some snow fell: the plastic worked as advertised.
The birch trees that blocked the south-south west horizon are gone, providing a larger window into the sky. I will finally be able to experience the intricacies of the Meridian Flip...
The weather has been very cold these past two weeks but also very clear: because of the construction, I cannot do much. I bet when this setup finally gets going, I will have clouds for weeks...
Not much activity this week end. I did put in the lag bolts, missing two on the north side due to lack of access. When spring comes, I'll dig around the posts and put the last 2.
Home Depot has shingles that sort of match the slate on the house roof, but it is a special order. I will do this next week.
The picture above was taken last weekend after some snow fell: the plastic worked as advertised.
The birch trees that blocked the south-south west horizon are gone, providing a larger window into the sky. I will finally be able to experience the intricacies of the Meridian Flip...
The weather has been very cold these past two weeks but also very clear: because of the construction, I cannot do much. I bet when this setup finally gets going, I will have clouds for weeks...
February 24, 2007
The 4th wall was completed today and by lunch time I had all 4 walls up and temporary held with bar clamps (thanks to Marine, I did not need to brace anything, she held one wall while I added the second one. good team effort). After checking for square and moving things a little bit, it was time to nail again.
Since I will not be able to do the roof until at least next week (I need to buy the angle irons first...), I decided to add short braces at each corner (near the top) to strengthen the structure.
The floor is a bit dirty: it was sunny today and near 5°C so the snow melted and mud was everywhere. And snow is scheduled for tomorrow night, oh well. The walls will have to endure, the floor will get the plastic cover treatment again.
I started on the roof wheel support this afternoon, and these guys are heavy ,even before adding the 2x8x12 fascia: it will be fun trying to lift them up! I ran out of nails around 4:30 pm and stopped for the day. The neighbors must be grateful for the quietness after a full day of hammer blows.
At least now the place is sort of useable. I will have to watch the kids (boy scouts) when they come for their Astronomy Merit Badge (which I start running next Wednesday) so that they do not think this is some sort of monkey bar contraption
I had thought of doing the walls with stucco to match the house but this is way too much work, besides Winter is not the right time to do this. Instead I will use shiplap boards and paint them, probably in brown to match the house's wood trim.
February 25, 2007
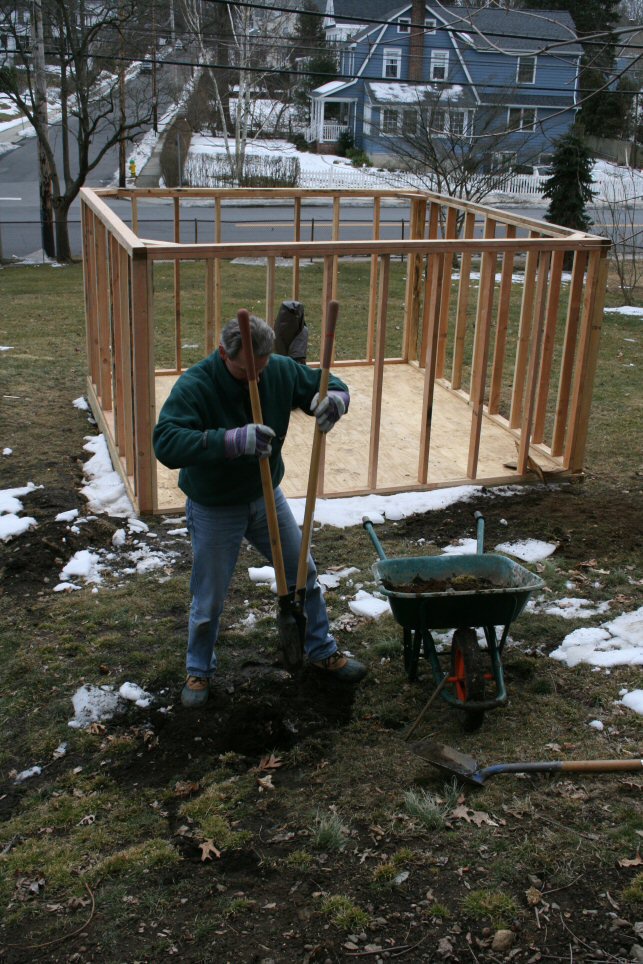
Before the snow comes in tonight, it was time to dig the holes for the two posts that will hold the end of the roof rails.
Of course, the first hole was just near a nice large piece of rock. I had to chisel out part of it (too big to dig out ) It worked ok but then I hit another big one about 20" into the ground: that's it for this hole, it will have to do.
The other hole was without fuss and taken care of rapidly. That's me in the picture using a post hole digger, a tool without which excavating such holes would be a royal pain in the you know what.
I continued working on the roof supports that house the wheels. Unfortunately while I am getting good at nailing, I still cannot drill straight and none of the axles are the way they should be !!!.
A better plan is in order if this is going to work Will address next week, I have done enough this weekend. These support are very heavy, I can barely lift one, much less hoist it over the wall. Time to call in for help.
The floor is now covered with plastic and the frame, well the frame will have to appreciate snow and not give me any grief
March 3, 2007
The weather was nice and motivated me to get going on the rear support posts. I did not have any 4x6x10 posts left so I glued together 2x6x10 boards and used 3" lag bolts to join them together.
My arms look like Charlie Chaplin's in Modern Times with all the ratcheting I had to do to drive the bolts into the pressure treated lumber.
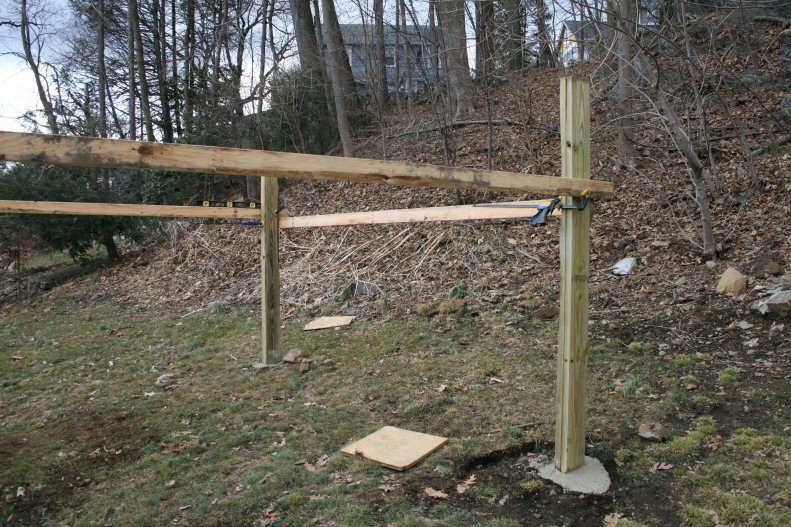
Then it was time to set them up and line them with the walls. I nailed a 2x4 cut to 11'5" to get the exact width on one of the post and while Marine watched the level, I clamped it to the other post. Same operation with 2x4x12's extending from the walls.
After that a few adjustments to set the post straigtht and the boards still level (again with Marine's help). And then it was time for concrete: another 2 80-lb bags went into the holes. Now we wait for the concrete to set.
With some time left in the day, I glued up 2x6x12 boards together and again fastened them with lag bolts. I now have the two rear rail support done: all they need is a notch. I may do this tomorrow.
I thought about my not so straight holes from last week and came up with the idea to make a guide jig, which I assembled in the shop. To be used tomorrow, after which I will start drilling holes in the steel angle irons I got Friday. And then, then it will time to start the roof!
Tonight was a total lunar eclipse and the skies were somewhat clear so I actually got to use the observatory and took some pictures of the end of the eclipse before the clouds came in (Saturn was nice but will have to wait). It is nice to have a flat floor under his feet and I can already tell that once the walls are sheathed, I will really enjoy not being annoyed by the cars' headlights . Just a few more weekends....
March 4, 2007
Put the drill jig into action: the picture shows how the guide works (on the left) and one of the two finished rail supports (upside down view) on the right. The wheels run much better when the axles are aligned properly... The good old 500W Bosh drill running on 220V came in handy to manage this rather large 5/8" auger bit.
I found an issue today with one of the rail support I built yesterday:
it is not straight (aaghhh!!!).
Of course Home Depot does not carry either 4x6x12 or 2x6x12... I had 3 2x6x12 left and used two to build a new rail support since I will need them next week end. Another moment of fun tightening lag bolts and dispensing construction adhesive. I will buy 2 more boards for the roof fascia this week from my lumber provider.
I also drilled holes in the steel angle irons and tried to countersink them, but the larger bit wore out after the 5th hole: time for another better quality bit. Again, having the Bosh drill was a relief. I am not sure how my 14V cordless would have handled this.
In the afternoon, with the help of my neighbor Ken and a friend from work, we propped up the two rail supports on the angle irons and clamped them in place. It coudl be done with two adults but it sure helps to have a couple extra hands. After that, I nailed the two fascia boards at each end and it was time to see if the contraption would roll or not. Drum roll and... yessir it rolls! Of course I had only nailed the anlge iron rails at one end (just in case) and the good news is that the rails are staying on the beams as the platform rolls back and forth. After that, I used screws to attach the angle irons (two per side to reach over 20 feet) to the wood beams. And it was time to call it a day! I probably spent a good 30 minutes rolling the thing back and forth; it just felt good !
March 10, 2007
I started with the rafters using 2x6x8 boards and got into trouble trying to use the circular saw without a guide. Result: one scrapped board and a trip to Home Depot
After that, I thought about how to do this: the plans only state to install them without any instruction as to how to do it...
So I cut some 2x4's with an angle at one end to serve as support and used them and an array of clamps to position the rafter and nail it to the rollers near the sloping edge.
Of course these boards are not exactly straight. One might even say they are a bit warped.
I did three rafters this way and before putting up the fourth one, I considered how to mount the ridge board which fits between the end of the rafters.
Using two 2x4's cut to the proper height, I propped up the ridge board (did I mention it is almost 12' long), myself being propped up on top of the step ladder.
Well, the wind started having fun and the ridge board came down crashing more than once. I finally drove a nail in on the single rafter side, and, when Phoebus was not paying attention, I positioned the board, moved the step ladder and quickly nailed it to the rafter. After that, it held in place and I coaxed the other two warped rafters into position and nailed them to the ridge board.
The fourth rafter was of course oversized (a good thing I did not put it up earlier or the neighborhood would have been treated to a few choice French expressions...). But all is well that ends and it was eventually trimmed and put in place.
Marine helped me with the remaining 4 joists, holding one end while I nailed the other. Much simpler than having to develop another jig and do a one man show!!!
Now the roof frame is done. The picture shows me nailing in the 4th rafter.
March 18, 2007
One foot of snow came down Friday and during the night. Then it started getting cold again.
Bottom line: Saturday was spent on clean up and waiting the weather out.
Sunday was different. In spite of snow everywhere, I went out, first getting some 4-inch outdoor screws and a 2' x 2' window.
Then I got going on the gables and the fly rafters: the picture on the left shows a fly rafter installation after the gables were nailed in. Setting up the step ladder on the snow covered ground was not always easy, but the sun was out most of the day and it helped.
The roof sheathing came next: 6 sheets of OSB cut to 6'4" length and two trimmed to about 46" wide.
Setting them in place required Marine's help to man the clamps while I held the board on the roof frame. Not always easy but it worked out well.
By 7 pm, we were done with the sheathing. The picture on the right shows how I had to go over the roof to nail in the sheathing over the rafters. By and large the boards are pretty well aligned except for one that is a bit out and there is light showing through. Not a big deal, there are holes everywhere, and the finishing will take care of it all (I think).
After that, it was time to cover the entire roof with plastic tarp: rain is expected on Wednesday and this material is not designed for this.
Next week, I intend to get the edge flashing in, the tar paper and nail the shingles. I also would like to ge the walls sheathed as well. Maybe this is a bit ambitious, but I am starting to want to get this done now...
March 24, 2007
The day started receiving the siding boards: 30 pieces 16 feet long. And right after that I framed the space for the sliding window with some 2x4's on the south wall.
Then it was time to get to the sheathing. I started the easy way, with full sheets. That is what is shown on the picture, the north and west walls starting to get covered.
I decided to use 2" spiral galvanized nails to make sure the boards would not pull out. Boy, what a poor decision! After the first two sheets and 60 some nails (not counting the many I bent), my arm was getting tired and I was getting really frustrated. A good thing lunch time came, it gave my addled brain a reprieve and the light went on : use screws...
After a quick trip to the hardware store, life suddenly became fun again and the job could go on.
Again, with the help of Marine to hold the sheets while I clamped them, the entire sheathing was done by 5 pm.
Then it was time to set the window in and it went relatively well except for one thing: I bought it as as a 2x2 window and used the 24" side for the rough opening. It turns out the longer side is neither the top or bottom but the right or left... and the result is the window is mounted at 90°. Not a big deal after all.
I capped the day's work with installing the door and covered everything I could with plastic due some rain forecast for the evening.
March 25, 2007
A beautiful day. What better time to do the siding! Of course, I have to use nails again. Home Depot does not carry stainless steel nails so I had to make do with hot dipped galvanized. Should be ok for this construction. It is not like I am building a house after all.
Siding takes quite a bit of time, and because the boards are almost 12 feet long, I cannot do this by myself. Marine and Ariane came to the rescue. While I was cutting the boards to size, Ariane did install the front door lock (having worked on the stage crew at the high school certainly has its advantages).
At the end of the afternoon (6 pm or so), we had done one and 1/2 wall. It does not sound that much but it was work nonetheless. That is what is on the photo.
Did I mention it was a beautiful day? Well the evening was also nice so I decided to give this construction a try and installed the mount and 4" telescope. When night came, I started doing some visual astronomy and although I could hear the cars passing by, I got no distracting light! This makes is all worth it
I even got the webcam out and took some shots of Saturn and the Moon. Then the Gemini system went south after I bumped the mount and it was time to wrap up anyway. But the best part was: I left the scope on the mount, put a tarp over it and pulled the roof in and voila. Done!
Time to tear down: less than 5 minutes! And since the door locks, no real worry.
This is going to be a good setup
There is still plenty to do: the rest of the siding, the roof shingles, some wheatherproofing, painting, drains around the north side, electricity, shelves, etc. But I can see the end now and it is about time: soccer season starts in 2 weeks.
March 31, 2007
First things first: got additional siding and roofing nails from the lumber store.
Rain is expected on Sunday so I decided to start with the roof. I spent the rest of the morning and beginning of the afternoon putting up the drip edges and nailing the metal pieces along the rafters to protect the edge of the sheathing. Then I cut 11' long pieces of roofing paper and laid them over the roof to protect the sheathing. Although there will be no insulation inside and I could have skipped this step, it just felt right to do it this way. I also will not have to worry about the roof for at least a few years.
After lunch, it was time to work with the shingles. These came in large pieces, about 3 feet long. It took me about 3.5 hours to nail the south face of the roof. The roofing paper I had put up has lines so there was no need to snap a chalk line to keep the shingles straight. I had not real info how many nails per shingle were needed so I probably went a bit overboard with at least 8 per unit..
The wind was blowing hard (as it had all week long, wreaking havoc to my plastic covers) and I had to add staples to the roofing paper on the north side in order to make sure it would still be there the next day.
This is taking a bit longer than I had thought but it looks ok.
April 1, 2007
April Fool's Day! And yes, the skies are gray and the rain is on its way.
I started around 11 am with the north side of the roof and made decent progress: halfway done by 12:30. This time I left more of the shingles overhang on the first row to guide the rain away from the walls. I will have to add another row to the north side to achieve the same effect.
After lunch, I reached the ridge under the rain. It is not really fun doing this while getting wet
I had cut a hole on the center panels near the ridge to make the ridge vent, and bought a ridge vent (a plastic contraption that allows air to escape from the interior and yet prevents critters from getting in, at least that is what they say: I will put mosquito screen on the inside to get piece of mind).
I did nail the ridge vent before laying out the shingles, which proved to be not terribly smart because I had to take it out...
The ridge cap shingles have three layers and the instructions are very cryptic. In the end (and mostly because it was raining) I decided on an approach and just went ahead. We will see what we will see but I doubt I will be seeing any leak for quite some time.
There are adhesive layers on the back side of the shingles and maybe one is supposed to melt it with a heat gun or something like that. I used nails, it should be good enough.
So now the roof is done (except for the extra row on the south side) and I got to go home early. No point in trying to nail siding in this weather. That will have to wait.
April 7, 2007
Today is siding day! With the help of Marine, we were able to finish the 4 sides of the house by late afternoon. Although I used a level for pretty much every board, and started the first one aligned to the same one on the other wall, we ended up somewhat misaligned when doing the final wall (the north side).
It does not really matter since the boards are level and the overall impression is good. In addition, I will add trim boards to each corner to protect the end of the siding.
I had my usual count of bent nails but I did buy a large 5 pound box and there are plenty left
Even though there was still light when we were done, my left arm was a bit sore and we called it a day. And it was a good day. With siding all around, this is starting to look like something finally...
April 9, 2007
I took the day off so I could do a little more before the soccer season starts again (next weekend already...)
To make up for yesterday's low pace, I finished the West side gable and started caulking all around both gables prior to painting.
The roof color was easy: Tudor brown just like the main house. The walls were still open until this morning when we decided to try to match the stucco gray color so that the structure would blend a bit better with the house. For this I needed Marine to come with me to the hardware store and pick the right color (with my skewed color vision, who knows what could have happened...)
After lunch, we both got busy: Marine with the walls and me with the roof and gables.
We got ourselves a good pat on the shoulder: job done before 4:30 pm, and it does look good.
After that, I went to Home Depot and got the pine for the trim boards as well as two longer pieces for the north and south walls' weatherstripping.
I bought insulation rubber people use for the bottom of garage doors and nailed strips to the inside of the north and south joists of the roof: when it closes, it closes and wind and bugs will have to find another way in!
On top of it all, the skies turned clear towards the end of the day. It was pretty cold for Spring (right around freezing) but I just had to try it.
I took the good old C8 out (28 years and counting) and when night fell, got to do some visual astronomy. The walls shield light very well, and also protect from the wind. I stopped around 10 pm due to some clouds moving in. A very nice way to end the day.
Now let's see what's left:
- Trim boards (to be painted and nailed)
- More weather and bugs protection: all nook and crannies need to be attended to
- Interior design: need a desk, shelves, cabinet and a bar (why not?)
- Exterior design: need rain drains on the north side and finishing around so it stops looking like a construction site.
- The dedication! A few friends helped and it would be nice to have a little celebration, preferably when the weather cooperates.
A few more weekends, but already the Pleasantville Observatory is functional. Hurray!!
May 13, 2007
Some time has past since my last post: the consequence of springtime activities and weather that does not always play nice.
I took advantage of some rainy weekend to work on the inside: On the left side in the picture is a worktable made from an old double thickness plywood piece I had scavenged four years ago from the waste dock at IBM (you never can tell when something will become useful).
I started on the wiring and got some of the wires through the conduit underneath the floor: the two holes (one next to the pier) open into a 2 1/2 pvc pipe. One cable is still too short and I will have to extend it.
Right now, all I need to get setup is to bring the long extension cord, a laptop and open the roof: this is a lot faster than last year.
Copyright 2010 Cloudsbegone.com | All Rights Reserved.
In the picture below, I have the 4" Borg scope mounted with the SBIG ST7ME imaging camera on the
GM8-Gemini mount. This is the basic astrophoto setup and I am still in the process of getting it properly
aligned to the pole as well as beginning autoguiding trials. So far it has been a trial alright but the success of
others tells me it is only a matter of time and application.
Tonight looks like a good opportunity (near new moon). Too bad I have to go to work tomorrow...
Tonight looks like a good opportunity (near new moon). Too bad I have to go to work tomorrow...